
Since I was in the
middle of rebuilding the arch on the third floor, see previous blog
entry, it seemed like a good time to start a brand new, bigger project
... can't have too many irons in the fire.
 |
| Clarence Harris posing with his bow and arrow in the backyard, 1959. The clapboards and cedar shakes seen in this photo are untouched since 1906 when the house was built. The trim held 3 coats of variously shaded lead white paint. The long awning over the sun room door and windows is just delightful. |
Mid-winter is not regarded as a good time to change out a door jamb, let alone yank out an 8 foot by 12 foot wall leaving a major hole in the house for weeks. But, we had been band-aiding the water leak around the door, under the threshold and into the basement wall, below, for about 2 years, and the weather wasn't that bad for February.
 |
| The back door as it was from about 1925 till 1958 when this color photo was taken. The simple steps were replaced by a massive deck and the nearly invisible cellar doors were replaced by a strange enclosure that looks more like an outhouse than the entrance to the cellar. Check out that orange clapboard siding. It's not painted. It's redwood that was oil finished and left to weather. A very typical treatment for clapboards and shingles on Shingle-style, Colonial revival and Arts-and-crafts houses from about 1890-1915. |
note: upon proofing this entry it appears that I complain a lot. My intent is not to complain, but to shine a light on the shoddiness of the work that a paid professional did for us. Please use this entry as a lesson when you hire someone to work on your house.
The old back porch was enclosed soon after the house was built. We have a photo from about 1921 that shows it enclosed by then, but it was not built as an enclosed porch. Look at that amazing black and white photo at the top of this page, if you look carefully you can see a small drain pipe coming out of the middle of the long wall under the porch windows, 5 clapboards down. That's the same kind of drain that is on the open front porch. No one would drain an enclosed room.
The back door sits in what was the 6-foot-wide opening onto the porch that is bounded on the right by an original square porch post and on the left by the exterior wall of the house. Originally, there were side lights that filled the space on either side of the door in this wide opening, but in 2005, all of the original windows, the 85-year-old door and sidelights were removed from the house and the old porch and filled in with vinyl windows*, a steel door and corrugated aluminum panels where the glass side lights were. All of them have been leaking ever since.
* Sales reps for white vinyl windows claim that their 35-year warranty is the best offered, anywhere. They claim that the windows will pay back your "investment" in energy savings within 2 years. In our previous house, built in 1895, the original wood windows were, with just a little care, in perfect working condition since the house was built. If your sales rep from World-of-Vinyl-Windows can offer you a 115-year warranty like that, then you should absolutely, no questions asked, make that purchase. Current studies show that the real payback time on new vinyl windows is 45-70 years, meaning, you will recoup your "investment" 10-35 years after the windows fall apart. Carefully consider all options before purchasing vinyl replacement windows.
 |
| Visible problem: left side - dark spots at threshold are wet porch floor boards. The torn up wood and vinyl are from about 4 layers of flooring added on top of the original resinous pine porch floor boards. |
 |
| Visible problem: right side - dark spots at threshold are wet porch floor boards. Not as bad on this side ... or so it appeared. Just remember what mom said: "appearances can be deceiving." |
 |
| Close up showing the PO's one-and-only repair tool: Spray foam. |
So, we hired Steve March, who had been working on a neighbors house for about a year, to repair the water infiltration issues around the back door.
He sold himself to us as an "old-fashioned" carpenter.
We fired him as an incompetent liar (recently, a friend, upon learning of this tale of woe, referred to Steve, more appropriately, as a charlatan.)
The one-day plan was to remove the door and the two small infill walls on either side, fit a new jamb and threshold, frame up and clad the new infill walls, and rehang the door. No big whoop, right?
When Steve arrived, 3 hours later than scheduled, we, together, began stripping off the aluminum coverings around the door. With some of the vinyl and aluminum removed the path of water infiltration became clear. It was coming in below the corrugated aluminum panels on each side of the door where the installers, who are still in business, left three-quarter inch gaps between the corrugated aluminum cover panels and the outside flooring and squeezed in a "bit" of caulk to seal that massive gap. The water then traveled below the threshold and into the wall below the door.
We had the rep from the company that installed this door and infill walls come over in early January to give us a price to replace the whole thing. He talked on-and-on about what a great job they did with the installation and that the reason our door threshold leaked was because of sagging due to the poor way in which the whole house was constructed 110 years ago. That's not the first time we were blamed for a construction workers stupidity ... read on.
 |
| That soft fuzzy looking stuff is wet wood. The leak on the side of the door traveled under the threshold and soaked through the floorboards and into the basement. |
 |
| Another view of the water-rotted original floorboards. It still makes me sad to see the neglect purposefully done to this lovely old house. |
 |
| Floorboards gone. Yes, it's sad, but also necessary to rebuild the door surround. At least only a small section was removed. The most damaged area. |
I Should Have Been More Insistent to use High Quality Materials
During the first day I discovered that part of the old porch floor was too rotted to lay in a new threshold, let alone re-frame the infill walls. After lengthy discussion, ok, mostly arguement, I agreed to the removal of about 9 inches of rotted flooring so that a new plywood "subfloor" could be fitted into the gap. I should have insisted on at least similar strip flooring, like the old porch floor, but I was not thinking clearly. Steve is a "fast mumbler" (he never talked, just mumbled), and looking back I cannot believe I settled, but, the floor will be covered with some kind of yet undecided flooring, so maybe it's not as bad as I think.
When the floor was removed the worst of the damage became visible. The whole wall below the door, the wooden upper-half of the basement wall, was water rotted through the clapboard and sheathing.
(note: I had no idea how thick old sheathing was. I thought it was about 1/8 inch thick material hung on a diagonal, but in this house its 1.5 inch thick planks of wood hung on the diagonal. DANG).It also became clear that additional water was being funneled into the wall because of how the deck was added (in about 1970.) The main deck attachment board was nailed, not bolted, on top of the clapboards, cinching the old, original stair flashing against the house and diverting water into the wall.
Hey Everyone - This is Important Stuff
When you attach something to your clapboard house, like a deck or a new porch roof, you must remove the clapboards in that area, first, to get a proper, secure attachment of the board to the framing of the house. Also, flashing must be carefully fitted up into/behind the extant clapboards above the attachment board or you'll have a wet water-logged mess on your hands.
Down came the clapboard and sheathing on the basement wall. The job just got big.
 |
| Layers of wood. From the very top is white painted clapboard, next are the diagonally laid sheathing planks, then the top edge of a 2x8 beam, and finally, near the bottom, a floor joist with T&G flooring (you can see the newly cut edges) |
 |
| How this house is "put together", or at least how the back porch floor and basement wall were originally put together. All of this is gone, now, replaced with crap-wood (it kind of makes me sick, writing this) |
Day one ended with some plywood screwed to the exterior of the house to close up the massive hole that was created. We were expecting snow that night for the first time this winter.
The basement wall immediately below the back door was rebuilt over the next few days. New studs were added onto the new sill plate we installed, ourselves, a while back, and new beams to span the damaged ones were installed. A "jack" was permanently added to improve support for this damaged area (these are metal pole systems that can be used as temporary or permanent support for weakened areas.) The sheathing is no longer beautiful 1.5 inch thick diagonally laid poplar, instead its that creepy "weather-proof" chip board so popular on new construction. A new door jamb was installed along with new framing around the door to fill the opening. It too was sheathed in chip board. I am kicking myself for not just doing this myself from the beginning. I would have used thick, quality materials. I spend my nights awake, listening for the new stuff to shrivel-up.
 |
| The end of day 2. Not my favorite look, but it's at least stronger and more supportive than before ... er, maybe. The shed to the left (door to the basement) had its roof changed from gable to shed. This should help drain water away from the house. Doesn't it look like an outhouse ? Also the sheathing on that little shed was changed out from vinyl siding to some kind of stamped Masonite. It looks appropriate, but new ... I don't think I like new. |
Over the next few days Steve and I fought regularly, and repeatedly, about how things should be done. We disagreed on flashing (I use it, he doesn't), we disagreed on style (It's my house, he wanted to tear off all the original clapboards and add plastic, Colonial Revival features from Home Depot to the exterior doorway, like eagles and flags) and we couldn;t find a similarity if life depended on it. He told me he never lies (I have a theory on people who say this, ask me sometime.) He repeated, over and over, that flashing is not needed in exterior home building but caulk can fix anything from a slipped disc to the national debt crisis. He repeated that he never builds things out of square (see stairs, below, for one example of 12 documented, out-of-square measurements.)
There were a number of days when he worked on the house while I was at the office. I'd come home and glance at his shoddy workmanship, have a talk with him the next morning and arrive back home that evening to see that he not only didn't fix the problem, but screwed it up more than it already was, and created a new problem. This became the exasperating pattern for about 4 days.
After that, Matthew, who, unlike me, is the opposite of OCD, began to see the issues more clearly. We had a "come to Jesus" meeting with Steve. He was given 2 more days to complete things the way we needed them to be done. We weren't asking for impossible feats, just fundamental skills. We wanted wood joints re-cut and re-fitted so they actually touched (in many cases, his joints were fitted with more than 3/4 inch gaps between parts); we wanted him to never use caulk on anything (he was a "flaccid-caulker"—people who hold the caulk gun, squeeze the trigger, and just flip it about - if they hit the hole where you need caulk, great, if not, great ... a lot like a 2-year-old using the toilet); we wanted the trash-strewn yard cleaned up.
 |
| That visible dark triangle is about 2 inches long and 1/4 inch at the top, at its widest. Problem is that there is almost a full 1-inch of unseen space behind that small gap. That means if water gets into this hole it can travel all the way into the basement through that 1-inch gap. He told me to caulk it. |
 |
| Scary woodworking. It's like looking into the mouth of one of those prehistoric fish that sit on the sea floor waiting for unsuspecting little fish to swim past; spikey, crooked teeth awaiting dinner. I pulled a piece of trim wood to see why it wasn't sitting flush - turns out 8-billion nails were in the way. I pulled out about half of the errant nails before snapping this photo (I'm bad about taking "before" photos). And check out that fine sleek caulk job, and the impressive wood joinery above. This is a freekin' shame .... This is the south-west corner that is still unrepaired. |
 |
| One day I came home and saw a plume of smoke coming from the back yard. Instead of properly hauling away the trash, Steve was burning it. The barrel he brought over for burning wood smoldered for 2 weeks—it never went out till I hit the roof and dumped 3 5-gallon buckets of water into it. |
Do I Have to do Everything Myself? or Does Anyone Know a Good Lawyer?
The day before he was told to never, again, set foot on our property, I had "a little free time" (oh, come on, you read this blog, you know that's a little bit of my humor, I haven't had "free time" since 1974.) Since he could not even complete the simplest tasks we gave him, see above, and since I was fuming mad and couldn't stand it any longer, I tore (almost) all of his work off of the house and began from (almost) scratch.
Since the new framing and studs he did were actually, sort-of, OK, I did not redo that. After tearing off all the clapboards, I lined the new exterior walls with tar paper from one of the rolls he bought with our cash (he stole the second while claiming that you only use paper under brick ... I want that roll of paper back ...) and added flashing before laying up the clapboard. This time, rather than lay the 7 inch tall clapboard with a 6.5 inch reveal, as he did (the reveal is the amount of clapboard you can see - in this case it means that the boards only overlapped by 1/2 inch, not only wrong, but irresponsible), I laid them with a 4.25 inch reveal to match the original clapboards, overlapping them by a more sensible 2.75 inch. I rebuilt the window ledge where he left a 1-inch gap between the sill and the wall. I rebuilt the door surround so it replicates the original exterior door surrounds, including coping ends to fit around the new crummy threshold.
 |
| Clapboards stripped off to expose inappropriate joint fitting on vertical corner board to house sheathing. In the upper-left you can see a bit of the "drip edge" Steve installed. It doesn't jut out far enough to be useful, it's nearly flat (it should angle down and away form the house to throw water out form the wall), and it starts a good 2 inches below the wood its intended to protect. Tore that off and rebuilt my own. |
 |
| Tar paper up, butyl flashing secured around door framing, clapboards begin their ascent to the top of the door. Yes, it was drizzling this day so I worked under the blue tarp. |
 |
| New door frame moldings coped to fit around the aluminum threshold. All hand cut with coping saw and chisels—it's easier by hand, really. |
 |
| Original back door to the house, now inside the sun room. Molding and surround replicated on new back door surround, below. |
 |
| New door surround. Using stock lumber I replicated the proportions of the original, albeit just a little beefier than the original. Painted, it's hard to tell its not old. |
 |
| View from the driveway—it doesn't even look lie the same house in the 2 vintage photos above. It was about 40 degrees this day but I was out painting (SW Resilience can be applied and cure properly as long as the temp doesn't drop below 35 degrees for about 48 hours.) |
 |
| This is where the foundation meets the wooden part of the house. Here you can see new structure (all painted gold) and old structure (chipping white paint) under the deck. Need to do some good things to this to refit things properly and close up the gap. |
 |
| The rebuilt "outhouse". |
 |
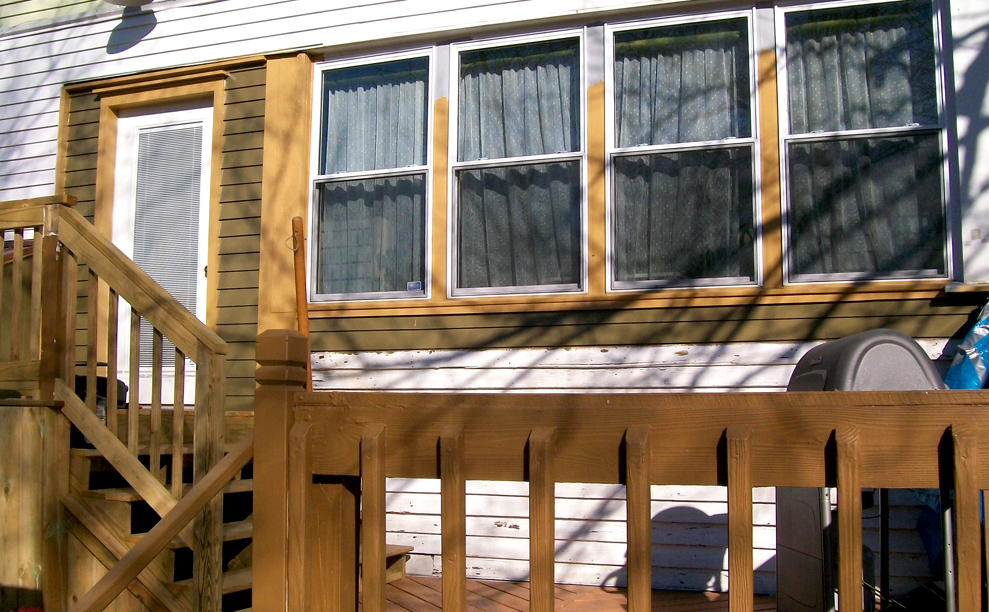
| South-west corner of the house. The sun room windows are visible in the upper left. Not only damaged by wind, rain and ill-fitted gutters, but, damaged beyond comprehension by Steve and his ever-present saw-zaw. I don't know what to do to repair this. There are boards covering the damage and some tarps wrapped around to keep it dry till spring when I hope the cure for this mess will come to me on the glitter-covered back of a unicorn riding a rainbow in one of my dreams. |
The worst of all the rebuilding was taking off the deck stairs. The stairs should pitch away from the house a little to drain water, and they need to sit at least 4 inches away from the house. The old clapboards on the house were in need of scraping, repair and painting, and the space between the stairs and the house was for me to get in there and accomplish that work (scraping & painting were not part of his contract.) On the day we did the final inspection, and the stairs were already in the wrong place, i brought up the agreed upon distance. He claimed that caulk would fix it all. I then asked if the stairs would drain away from the house. His reply was that he builds everything square and level. When I laid my 4-foot level on the stairs, not only did they not pitch away from the house, they weren't level, either, but they did pitched into the house. more water funneled into the wall.
His level said they were square, mine must be broken.
On this day he didn't have his special magical level in his truck to provide the "correct" answer (yes, I'm still bitter ...).
Next, he not only built the stairs right against the house, he nailed them into the house. Almost like he was saying "ha, ha, I screwed you ..." (...still bitter...)
 |
| Stairs before rebuilding—slammed smash-tight against the house, just like I said not to do. |
 |
| Couple of coats of trim paint on. Same colors used on Front porch, and eventually whole house. 2 things to look for: 1. the stairs in this photo have been rebuilt about 6 inches from the house. Hard to tell at this angle, but they are. 2. The tall, rough-looking board next to the window on the right is an original trim board for that column. Steve destroyed the column while Matthew and I were away and I was heartbroken (the wood was perfect, no rot, he just didn't like it.) He redesigned the way the column sits, extending it to the foundation, which is not correct for this style of house. After grieving for the destroyed column, knowing he burned it in that nasty barrel, I found this lone board in a pile of vinyl siding. I scraped it and installed it back where it was. |
It took Matthew and I nearly 4 hours to un-build those stairs one Saturday morning, carefully prying them from the house without damaging the old clapboards. It took me, alone, only about 1 hour to correctly build them 6 inches from the house, pitched properly, too. Having that space improves ventilation under the deck, too.
While work moved forward on the house exterior I learned that the clapboards, which I thought were cedar, are indeed redwood. That better explains the brilliant orange color of the wood in the color photo, above. I also researched to learn that in about 1880 redwood became more readily available since the lumber barons in California stripped the old growth trees out-of-existence, milled them into weatherproof timber, and shipped eastward for home building. Also, check out the colonial shape of the clapboard, with that severe bevel cut into the upper, overlapping, edge. Redwood clapboard is the "Cadillac" of siding and is available today for premium pricing.
 | ||
| Back-side view of the original redwood clapboard siding on the house. The upper edge bevel is visible on the lower right part of this profile. |
 |
| Original clapboard below the sun room windows, finally freed from 30-plus years of vinyl enclosure. With the exception of the ends near the red ladder, they are in remarkable condition for having been exposed to 110 years of the worst weather (this is the west side of the house and receives the most extreme winds, rain and sun). I'll be proud to restore these this spring. |
Painting Peace
Nearly 2 months after starting the work, loosing sleep from emotional exhaustion, I was finally able to put on some paint this past week.
Painting is very zen for me—I find it calming to concentrate on small details and get carried away from the overall dread of the work and carried into seeing only the color and shapes being created at the tip of my brush. Strangely, I feel the same about applying caulk, and now, I learned, laying up clapboard. These tasks are rhythmic and soothing.
 |
| Dark Olive Green body color with Fawn trim, both Sherwin Williams colors. Yes, the white will go " by- by". Sadly, and in classic form, there is no before photo of this area of the house ... |
 |
| Here you can see the rebuilt window sill, some new clapboards under the sill, and the whole new door area. the upper deck is new as is the wall below the door (unseen, blocked by the deck). |
Overall, the back of the house does look a bit wonkey and patchwork since there is still work to be done on the "old" house before painting the entire area the same color - but getting this much done in between bouts of rain, sleet and 2 days worth of some very severe tornadoes (you've all seen that on the news), is a huge step forward. At least the wall is put together more correctly, now, and the wood is protected with 4 layers of new paint over 2 layers of primer.
*Overkill on the paint ? maybe—maybe not. This wall faces west and gets the worst of the rain thrown against it. I'd rather have the extra layers of paint than not enough.
Till the weather warms, I think I am finished with this part of the house. It's stable, now, and that big hole on the front porch that Matthew's foot made when he fell thru the floor is a bigger issue.
I'm sorry you had such a lousy experience. It sounds like you are pretty particular about how you want things done, and I don't think that's ever a good combination with hiring a contractor. It seems like any time you're really particular about how you want something done, you're best off just doing it yourself. Same reason I have a hard time hiring people...
ReplyDeleteThanks Reuben, You're right in some respects, I am pretty particular. In this man's case, he was lacking fundamental knowledge of how to build. That added to simple instruction following inability - we all would be kind of miffed if the painter we hired painted the room lavender instead of the color we told them to, it was that simple - made him a bad choice. Many comments from people who have read this have confirmed, at least, that Im not the crazy one ... ha ha.
ReplyDeleteThanks for stoping by and reading - make yourself comfortable and read more.
I would like to know what it cost you to fix the problem from the leak below the door. I have a similar problem from a door poorly installed. It was 5.5 years ago. The company is jerking me around, not getting on it, took the door out and was dismayed at how extensive the damage appears to be (haven't even opened up the basement wall below . . . .) and is stalling. They took the door out and then put it back "temporarily" while they are figuring out what to do with me. Now the temporary door installation is leaking like crazy and they wouldn't even come over and seal it off from leaking into my house (I called Sat and it is now Tuesday night, still raining (I live in Seattle) and they haven't even done that! Two months before I leave the country and have the house rented for that two months. A nightmare.
ReplyDeleteHi katherine, since making the difficult decision to sell the home i have not been on here at all. Thats why my reply is a year late. We paid 3,000 for the horrible work and materials (half of which were stolen by the workman). But the majority of the correct work was me.... Books, utube, any old house forum and a few magazines supplied the know how. We didnt even offer the company who installed the door (for the previous owners) to touch it since we knew it was beyond their skill level.
ReplyDeleteI hope you had the door and wall repaired well and are moving to a new restore, now. My best, jim