The Joshua Shively House has changed hands once again in its 108 year history.
The new owners are excited about the history and character of the old place and we have not only changed cities, but found a new home to continue building our life together.
Please be sure to visit the new place - Stone Shack - and see what kind of trouble I can get into, now.

12.13.2013
8.30.2013
THE END OF A short ERA
The Joshua Shively House is now on the market.
For those of you who may have followed along the past 6 years of restoring this gracious old home, the owner is selling this lovely estate.
Ill pass along the Real Estate listing so that you can see how to make purchase of this old manse, but if you're curious about how well put together the old place is, read some of the postings, here.
10.14.2012
Let Me Tell You a Story About a Porch

“My uncle says there used to be front porches. And people sat there sometimes at night, talking when they wanted to talk, rocking, and not talking when they didn't want to talk. Sometimes they just sat there and thought about things, turned things over. My uncle says the architects got rid of the front porches because they didn't look well. But my uncle says that was merely rationalizing it; the real reason, hidden underneath, might be they didn't want people sitting like that, doing nothing, rocking, talking; that was the wrong kind of social life. People talked too much. And they had time to think. So they ran off with the porches.”
— Ray Bradbury, Fahrenheit 451
We have a front porch. It's a pretty big front porch as far as porches go, today. Long and deep with views that line up with the neighbors porches. We love our front porch.
Last year we began restoring the "interior" of the porch. Stripping off the 1970's vinyl, it was a summer of discovery and frustration. Removing the vinyl proved fast and easy—repairing the wood beneath, a bit less so. Not because the wood itself was in bad shape, but the nails that held the vinyl on ruined the wood in a number of places. The goal was simple: return the porch to as near original condition as time, skills and cash-flow would permit. We did a great job, but this past spring I realized we were only about half-way done.
Another summer on the porch
So in about June, 2012 the vinyl started coming off of the "exterior" of the porch.
Our historic porch is fairly common to turn-of-the-last-century porches. Not only is it integral to the house proper, but it has massive corner "walls" rather than posts to support the roof. It also has a short knee-wall that surrounds the space rather than a railing. This creates a comfortable, interior, room-like setting on the porch, along with an exterior that fits seamlessly with the walls of the house.
Last year the big discovery while we were taking off the vinyl was that there was originally a set of french doors from the parlor out onto the porch. There was one major discovery this year. underneath a box of aluminum flashing we found a beautiful cove molding above the framing on the front of the porch. Interestingly, it's identical in size and shape to the cove molding used on the parlor ceiling beams—maybe they are original to the house and not later additions as I was told.
 |
| The wonderful cove molding is visible in this photo (at the top left). The paint was in better condition nearer to the top than the bottom since no rain could hit that part of the wall due to the deep eaves, |
 |
| This is what we uncovered—filthy, dusty, cobweb covered, chippy paint, and tons of monster nails. The three yellowish bits are thin styrofoam insulation that was beneath the vinyl. You can see the original ogee trim right under the gold painted ledge, as well as the damage those nails did to the bottom edges of the clapboards (they split the bottom edge right off in some places.) |
 |
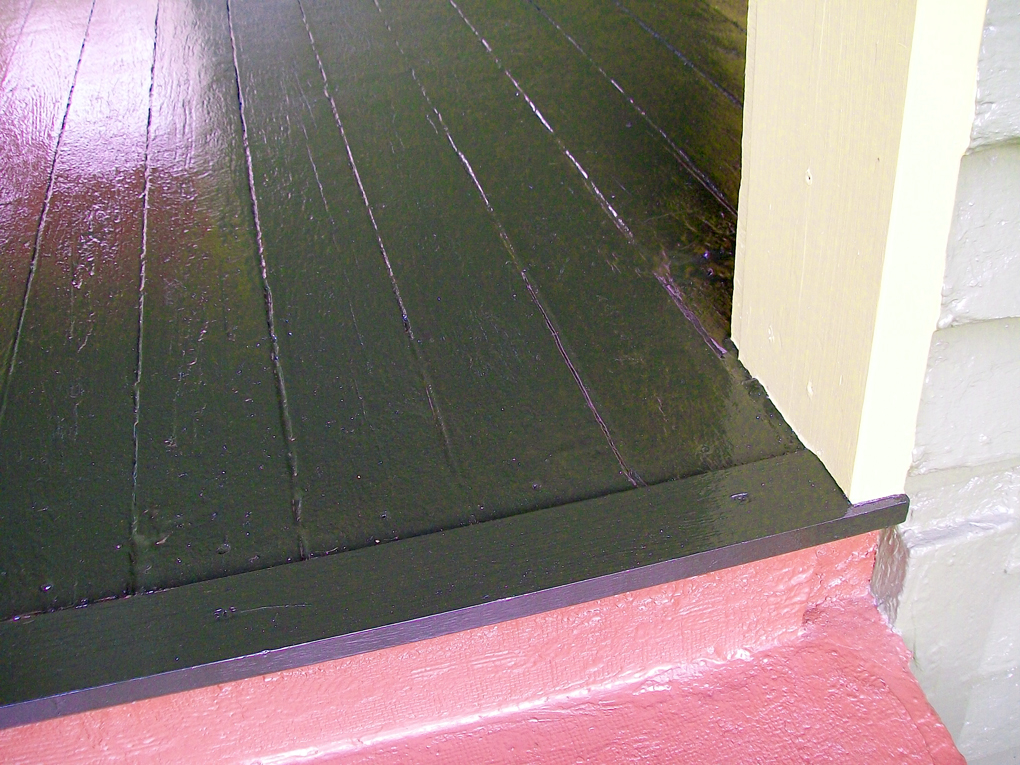
| This looks worse than it was. Several layers of caulk were added one on top of the other in an attempt to seal up the joint between the cement stairs and the wood framing of the house. The vertical board near center-left has a shallow notch cut into it at the top to hold, what I think, was the first stair tread. Looking closely, behind the black pole (part of the handrail) you can see that the ends of the floorboards originally extended further than they do now. There is a curved cut-out around the handrail and to the left is the original end of the floorboards: On the right is the cut back edge (see below for more on the edge of the floorboards) |
As you can see, above, the clapboards on the exterior of the house were clogged with dirt, cobwebs, chipping paint and many climbing vines that snaked below the vinyl and up the walls of the house. It was a huge relief to see that no rot had taken place. In fact, the only damage was from the installation of the vinyl where aggressive handy-men nailed huge roofing nails all over, splitting clapboards and chipping off chunks of redwood.
I'm an old-fashioned guy... I want to be an old man with a beer belly sitting on a porch, looking at a lake or something.
— Johnny Depp
Scraping and sanding came next. That's always the messiest part of the work. We were covered in dust and chips of paint for weeks. I may have spent more time vacuuming than I did actually scraping. We even had to spend a rainy Sunday washing the dust off the porch so we could paint.
Fixing the stuff we couldn't do last year
Some moderate repair work was still needed on the interior clapboards we uncovered last year. The bottom clapboard edges in one corner of the porch were rotted out a bit. Nothing too major, but if you're doing the job, may as well do it right, right ?
The whole perimeter of the floor/clapboard junction was edged with a tiny window stop molding. This was way easier than filling the junction, which over 100+ years had opened up a little, with caulk or some kind of expensive filler. It also gives the porch a little more finish. I painted it the same green as the clapboards so it wasn't too invasive to the space.
 |
| This was the worst corner. The last clapboard on the left side had rotted up about 3/4-1 inch. I filled it with some Abatron Wood Repair Epoxy that I had left over from rebuilding the beam on the back of the house. After adding the trim and painting, it was barely noticeable. |
 |
| The junction between the floor and clapboards was not a right angle, so ... I went to Lowes and wandered the molding aisle. I don't have a table saw to rip wood, so I go to Lowes and wander the molding aisle to see what I can configure into something that will work. This little stop molding looked good and the tiny size of it was forgiving of the non-90 degree angle. A bit of caulk smoothed out any uneveness in the fit, and ... voila! |
 |
| Same corner as first photo, above, but with the patch in place, the small stop molding trim added and the floor finally painted. |
Next the intense repair work that we were unable to finish last fall—mostly on the floor and below the porch in the foundation—needed to be done (the weather made it impractical to make these repairs last fall.) All of the screws used to secure some cheap-ass chipboard over the original floor (so the previous owners could DIY-lay tile on the floor, eww) were rusted in place, needed to be removed and the holes plugged. The porch floor needed to have about five feet of floor boards replaced. They were damaged by water that seeped through the huge grout lines the DIY'ers left between the tile and was trapped below the chipboard and rotted the floorboards. Interestingly, those boards were replacements, too. The whole floor needed to be scraped of three coats of paint and sanded.
 |
| Kind of an overview of what was finished last fall. The drain that originally channeled water off the porch is the dark strip on the left-most side of the floor. |
 |
| Another view of the worst of the floor. The drain, again, is the dark strip on the left side of the floor area. The removed tiles are stacked, awaiting pick up for reuse. Love those apricot and southwest blue-green colors. the step-stool is covering a hole in the floor ... funny story. |
 |
| One side of the porch floor, finished. |
 |
| The other side of the porch floor. Shiny, shiny, shiny. |
The original metal drain that removed water from the porch floor was rusted through and water was running through it and onto the foundation and into the basement. Rebuilding the open metal drain was more costly than expected and would have required pulling up the whole floor. I decided to cover it. The foundation and basement walls needed to have the sill plate rebuilt, several studs replaced and a good bit of interior tuck pointing done to the brick foundation. Some small repairs were needed to the interior walls of the porch. Again, no serious repairs were needed on the exterior part.
I'm not the type to sit on the porch and watch life go by.Then they invited the enemy over for dinner
— Sally Rand
Another problem, and an additional reason to to do some foundation work, was the termite attack that the PO's caused. The clueless PO's piled wood mulch about 15 inches deep right up against the wooden part of the house. That's like a circus, or free money or the bestest red carpet ever for termites. So, in addition to the fact that they didn't maintain the wood of the house (and seemingly encouraged water to pool and rot the foundation) they sent out engraved invitations to the termites near and far for a feast to end all feasts. The termites are gone, now, but the wood was not doing well in some areas. It was kind of intriguing how those little buggers destroyed only certain species and pieces of wood, ignoring others right next door.
 |
| An end cap 2 x 12 at the top of the stairs. The rough texture under the paint is due to termites. "Someone" painted this panel last summer knowing full-well that it needed to be replaced in the spring. The thinner strip of wood trim on the right, also painted gold, was unharmed by the termites. Go figure ... |
 |
| After removing that endcap, the 2x4 structure below was demolished. That orangish piece of wood WAS a 2x4 stud that held up the roof support. You can also see clapboards to the right that are a bit warped, but not damaged by the termites. |
 |
| Another view of the same wood area, above. Its a little harder to understand what this is, but the extent of the damage is more clear, here. I fit in some 2x4's to the left and right to support the porch post while the foundation was being repaired. |
 |
| Same part of the porch but on the other side with repair wood installed on end, where the termite damage was and clapboards scraped, sanded and primed. A strip of Ogee molding still needs to be installed under the gold colored ledge—see below. |
We ripped out the damaged floorboards to give access, and much needed light, to the basement foundation below the porch. We have a small hole to crawl through in the basement—this part of the foundation is blocked from the rest by a wall. Replacing the sill plate and repairing the studs was straight forward. We sistered as many of the original studs as possible since the clapboards and sheathing were still soundly nailed into the originals. The brickwork was also pretty straight forward. Matthew is excellent at repointing bricks. Some modest spray foam insulation (from a can) was used to plug a handfull of holes between sheathing boards and around the sill.
You know they were addicted to Trading Spaces
I have no photos of the foundation work, so enjoy these of the floor, which I'll talk about next.
 |
| The floor showing, from left to right: 1. the original floor boards (stained and oiled, then 3 coats of paint added overtop), 2. the chipboard that was DIY screwed down as a base for the 3. hideous southwest colored DIY-laid tile with at least 1 inch grout lines all over. |
 |
| This is an area of previously replaced porch floor. Note that it is rotted through, but the original old growth pine is not damaged. The greenish tiles are covering the hole ... |
 |
| And, here's the hole. Matthew stepped right through the floor one day. I ran to get the camera but he was out before I got back. We covered it with a door mat for the winter in anticipation of replacing all of those boards in the spring. |
 |
| Boards being yanked out. This gave us a perfect opportunity to snake down into the "basement" and repair the porch foundation. |
Once the foundation work was done I could catch my breath up on the surface and lay the new floorboards.
The new tongue-and-groove floorboards were caulked in every groove between the boards before being laid tight. Only the tops were primed, the bottoms were left unpainted. This way, if any water does seep through, it won't be trapped within the skin of paint and can evaporate from beneath the floor. I painted the floor last, after everything else was done, so the freshly painted floor didn't get trashed from walking on it to do other work.
The original wood stairs to the front porch are long gone. Instead, and like most of the houses in this neighborhood, cement block stairs were installed. At some point, indoor outdoor carpet was laid over the cement stairs. That was removed soon after we moved in, although all the glue residue was not scraped off. We painted the stairs the same brick color as the foundation (or the same brick color it WILL be) just to give them a sort of better look while we went on to redo other things.
The edges of the floorboards extend out over the top cement stair about 2 inches. When the tile was put on, a metal carpet strip thing was laid over the top edge of the tile to "finish" the work (and trap any errant stream of water to try even harder to rot the wood ... stupid stupid stupid.) I removed that metal edge when the gross tile was removed and saw that the ends of the floorboards had held up OK, but were a little rough and uneven fro someone cutting them short about an inch. I wanted to make that edge more secure so that when someone stepped on it, they wouldn't fall through.
I trimmed the board's ends back by another 1 1/ 2 inches and inserted an oak 1x3 across the ends of the newly cut edges. I filled the joint with caulk and caulked most of the gaps between the boards. This should help prevent any potential water rot on the ends of the floorboards, as well as give that top edge more security and stability as well as a cleaner finished look.
 |
| Scraped and sanded floor at the top of the stairs. The roughened edges were cut back. |
 |
| Heres the oak board added to the top edge. There was a 2x4 fitted vertically below the newly cut floorboards to support the new oak and give me something to screw into. |
 |
| Another view of the top step. The oak was primed and painted to match the floor. |
 |
| This is the same spot as the photo above, finished. Now you can see how well the edge looks since it's painted the same color as the floor. |
Repairing the mess the hired help made
On the exterior walls, holes from the nails that held up the vinyl were patched and sanded flat. Some edges of clapboards needed repair from where those nails form the vinyl split clapboards. In many cases the wood was all there and all I needed to do was glue it back together. Every vertical joint between the corner boards and each clapboard was caulked. Since clapboards are shaped to shed water, I leave the horizontal joints between clapboards open so any water that does seep in can evaporate from between the clapboards. Since the old paint was oil-based, everything was primed with alkyd primer tinted deep grey in anticipation of painting with latex.
the Ding Dong Hole
I wanted to be that cranky old guy that stands on his porch and yells at the neighborhood kids.
— Robert Lansing
Last summer I removed the glow-in-the-dark 1970's era doorbell so I could install a brass one we have had for years. I ran into some trouble with that so the replacement didn't happen. Read the story about how I fixed a troublesome little bell-bugger.
Crackin' Frackin' Stinkin' Flickin' thing
Right below the doorbell is the original oak threshold. Covered in years of paint and varnish it was a bear to clean off. Sanding it didn't make any significant change—it just was a smoother mess. Rasping it helped—but wasn't potent enough to take off all of the crud. Using an electric sander didn't help—it generated so much heat that it melted the old finishes into a gooey mess. A hammer and chisel worked a little.
Finally, I dug out my oscillating hand saw (cheap, knockoff of a Fein Multi-Master) and strapped on a wood blade and literally sawed off the gunk. I made a few small digs into the wood, but sanding afterward evened things out. A couple of coats of shellac gave the old oak a great glow, and finally some spar varnish on top of that brought it back to what I assume was its original appearance.
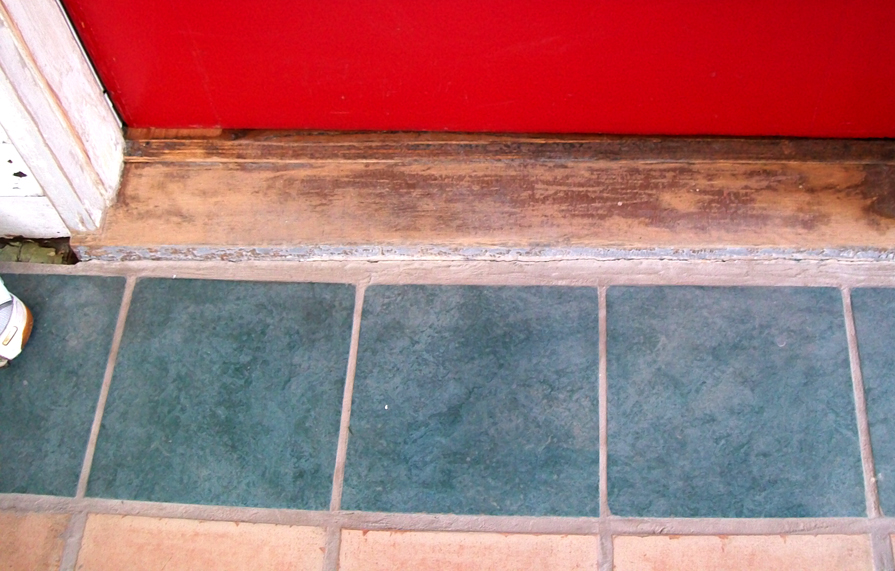 |
| Top Down: Fire-Engine-Red door that I can't wait to strip; threshold, partially scraped top-part and untouched front edge; ugly tiles. Since the top was walked over so much, it came clean faster and easier than the front edge. That was a bear—and at a horrible angle, I had to lay on my belly to get at it. |
 |
| Once I scraped and sanded the top of the threshold I put on a few layers of shellac to keep it clean while we painted and did other work. The front edge took time to clean up. Here it is with about 6 inches clean on the left. you can see how bumpy and gloppy the edge is with paint and varnish. |
 |
| Threshold cleaned and shellacked, though the floor still needs painting. |
 |
| Closer view of same, that dark spot on the end is from a huge staple that was driven into it - might have been from Christmas lights or something. |
 |
| Threshold, done. Now it's not a bad looking entrance to the house, eh? |
Tighten up
Around the screen/storm door I added some spring bronze weatherstripping. Maybe that was overdoing it since the main door to the house is weatherstripped, but I figured any bit helps.
Both doors are wood. Storm doors should not be weatherstripped if the main door is steal. the heat that builds up can warp the steal door.
The kind of weatherstripping I put on is the kind that everyone paints over in old houses and then gets pissy cause it wont work any more (cause you painted it flat, dummy, and it no longer can spring open into place to seal the gap...) It is expensive, and you have to buy special nails for it, but it went up cleanly and easily enough one Sunday morning. If I remove it there will be just some tiny nail holes to patch. It is also adjustable—spring it out more if the gap is bigger in some areas. In old houses, that flexibility is great since often doors and door jambs are not perfectly aligned any longer (you can remove the door and repair it, fix hinges and scrape off gobbed up paint and it will be nearly back to original working order.)
"It's da plumber, I've come to fix da sink"
Back to that open drain issue. I troubled for months, maybe a year, about how to fix the ailing damaged porch drain. It was a little perplexing since, from my perspective, there was nothing to fit a "cover" onto and maintain the flatness of the floor. Long-troublesome-story-short, I relied again on the molding section at Lowes to inspire me. I wandered the aisles looking for some style of trim that could fit the space and not just look like a hunk of wood thrown down haphazardly, just to cover the drain. I ended up getting an off-the-shelf baseboard and screwing it down to the edge of the floorboards. The pictures show it better than I can describe.
 |
| Drain covered with new baseboard, caulked, primed and one coat of paint on the green and gold. Added a second coat and finally painted the covered part the deep brown of the floor. |
 |
| OK, so the photo is out of focus. I hadn't had any coffee yet the day I took this so ... Anyway this is the drain area finished. Not horrific to look at and not really noticeable now that its all painted deep brown, which was the whole idea. |
Oh Gee, Oh Gee
 |
| Original ogee molding on top, replacement on bottom. It's the closest in general heft and shape that comes off the shelf. Could I have had it made ? Sure. Am I in any way disenchanted with what I chose? No. |
I replaced the ogee molding that originally trimmed the under side of the knee wall ledges. The original could not be saved after those nasty termites gobbled it up. But I had enough of it to get an acceptable match in PVC, so no more rot or termite dinner.
This molding trimmed the undersides of the porch ledges as well as the underside of the water table/drip edge molding. It is similar to the molding used to trim the tops of the outside door frames. I have not uncovered any of the exteriors of the window frames, but I'll just bet this molding is the same used on those frames, too.
To "class-it-up" and add a little "punch" to the porch I chose a deep red paint for this little ogee molding. You can't really see it till you sit down on the porch, so it is a nice, little, visual surprise. It's a great contrast to the olive and gold and is so dark, nearly black, it helps deepen the recesses under the ledge and the deep eaves around the house (see below: It was also used on the soffit and will be carried throughout all of the soffits/deep overhanging eaves.)
Just to sit and look at the landscape. An inner quietness. After dinner, to sit on the back porch and look at the light. No need for talking. For any kind of communication.
— Lee Krasner
On the outside of the porch after the nail holes were patched, some caulk, some primer and a few coats of paint were really all that were needed to finish things up. The body color is deep olive and the trim old gold.
The soffit was painted the same deep red as the ogee molding to contrast with the olive of the body and add vast depth to the deep overhang of the roof. We had to wash a lot of the porch that we painted last year and add a fresh coat of new paint over top since so much dirt was kicked up during the rebuild and scraping. I also painted the stucco-over-brick foundation. It's a deep brick red to emulate brick and help it look like when it was built. The stucco is not original. I have a photo from about 1918-1922 that shows very clearly that there is no stucco on the foundation.
 |
| A short diagram of what a soffit is. just in case you were wondering ... |
Then, there were the finishing touches: the new drapes and drapery rods from Ikea, the new roller blinds we'll use to keep some water off the porch, the new porch light and in the spring, new paint for the wicker furniture.
 |
| Thankfully, Lowes carries a plastic roll-up blind in a color that works well with the exterior (its the same as the panels in the ceiling.) I painted the Ikea drapery rods bronze—they were silver—and used gold paint on the screws that hold up the rods to add a little more color texture. I used gold colored screws on all the exterior things that are bronze colored. |
And finally, WHEW, I painted the floor and the steps up to the porch. The floor is a deep charcoal-tobacco-brown color. I had it custom mixed in oil at Sherwin Williams (all the paint comes from SW.) It's a very sophisticated color and looks great with olive, deep gold and the hot pink and orange of the furniture cushions. It also sort of replicates the feel of original stained and varnished wood that the floor originally was (there were too many repairs to the old-growth pine floor to make stripping and re-varnishing practical, so I painted it.)
When I was about 3, my grandfather used to give me and my sister a nickel to sit out on the front porch with him and sing songs.
Before and After Gallery— Tommy Shaw
 |
| Exterior front BEFORE (August, 2009) |
 |
| Exterior front AFTER (October, 2012) notice how much bigger the boxwoods are—almost a real hedge, and the roses have gotten big, too. The awful front door is still that screaming red ... at least its not pink ... |
 |
| The spring after we bought the house, May, 2008 |
 | ||
Last year, November, 2011
|

10.03.2012
The Ding Dong Hole
Since last summer the doorbell on the front porch has been MIA.
We've had a replacement button that we bought at an antique show for years and years. It's not old, but was a great price and looks the part. When we redid some of the porch last year I took out the old 1970's glow-in-the-dark one and was set to fit in the new one when it didn't fit. The hole that is drilled into the door frame was too small to allow the cylinder that houses the electrical connects on the back of the door bell to fit in.
So for nearly a year the door frame has looked like this:
 |
| yeah, this was my front door for nearly a year. the wires held up fine, even if I did get a little paint on them when I painted the door frame. |
Now, I hear you saying, well shoot, why didnt you just drill the hole bigger and get the danged job done. Dagnabit, I thought the same thing ... but, ya see, there are those 2 wires hanging out of that hole. Maybe you know a secret that I don't, or you have "magic", but I was really perplexed about how to drill a hole without damaging those wires. Or loosing them down into the hole from which they protruded. Either way, I'd have to replace them and I have NO patience for such stuff.
Something you may not know is that I hate electrical work—and plumbing, too. Oh, I do it, mind you. But I hate it. I hate those stiff fat wires that you're supposed to bend around a teeny tiny connector and screw down. I hate the fraying that multi-strand wires do. I hate how my arms feel like they've been drinking when I install ceiling lights. I hate fishing wires. Oh god I hate fishing. I think I'd rather face a tigress guarding her cubs than the prospect of fishing wires through a wall.
So I waited to see if divine intervention would happen.
tap tap tap .....
nothing .....
When push finally came to shove, and I had to get this job off my list to get on to the next step in the porch restore, I posted a note to an online old house forum. I didn't expect much. I figured I wasn't asking what style of house I have (those posts always get the most attention) nor am I that much of a regular that others find me intriguing or fascinating. But within 24 hours a few good folks replied with —TA DA — the perfect answer.
They recommended that I use a gouge (essentially a scooped or rounded chisel) or a small round file or rasp to gently enlarge the hole without disturbing the wires. I swung by Lowes in the afternoon to pick up a gouge. I have secretly wanted a full set of gouges and Japanese chisels for years, but my pocketbook won't let me be so frivolous. Of course, they had nothing. While I was there I spied some 1/4 inch wide chisels and thought, "I could use one of the tiny chisels I already have at home and chisel out the circle I need."
Home I trudged and grabbed my 1/4 inch chisel (one of the good ones my dad gave me), a hammer and some other stuff I'd need, and went to work.
The first thing I did was make a template of the correct size hole I need to carve out.

Tracing the pattern gave me the exact outline for the chisel work.
 |
| I love using red sharpies to trace things onto painted wood outside - like marking screw holes and such. It wont work for all situations, but the red marker is permanent so I don't worry about loosing my mark, and the red color tends to blend in to either the gold or green of the house without looking unsightly if it isn't completely covered. |
I taped the wires out of the way and started to gently tap out the excess wood. The back of the hole was wood (the hole did not go through, but dead-ended in the wood) so I was extra careful to smooth out that back surface with the tiny chisel. I kept a flashlight handy to check the interior of the hole and to see where I needed more work.
 |
| Hole being resized. The wires were taped off to the opposite side of the area to keep them out of the way of the chisel. if you blow-up the photo you may be able to see that the wires come from the lower right. There was a hole drilled into that area through which the wires were fished to the door bell. chiseling around that part was very tedious. |
Thankfully I was very careful and examined the hole before I began. The 2 wires for the doorbell came out of a tiny hole that was drilled in one "corner" of the back part of the hole. If you look closely you can see them protruding out of a small hole in the back lower right of the larger hole in the wood.
 |
| Hole finished being resized, small holes drilled above and below for tiny screws to hold the new door bell in place. |
Finally, after about 2 hours of careful slow, methodical chiseling, I had the hole the right size and cleaned out of wood debris (a bamboo skewer and shop vac made quick work of cleaning.) I test fit the doorbell and it fit just right. Screwing down the wires to the connectors on the back of the bell was the hardest part for me. But I am really pleased with the work and glad that the new doorbell is in place, looks great and actually works.
 |
| The completed door bell held in place by new brass screws. The only thing I wish I had done first was disassemble the bell and paint the white button black ... maybe one day. |
A huge thank you to sombreuil_mongrel, columbusguy1 and rmtdoug
for their input on solving this little conundrum.
7.20.2012
The long hot summer begins ...
We have been pulling off vinyl on the exterior part of the front porch
this week. The clapboards look pretty good underneath. A few boards need
replacing, and a new drip edge and trim installed. Before photos posted
- stay tuned for the rest of the story.


6.04.2012
My Crummy Old House Looks Better than Yours ...
In a previous post, in March (so long ago), I detailed the rebuild of the back door and all the other crap that had to be redone, as more and more wet-rot was discovered on the west wall (the back) of the house. One part of that rebuild that was attempted, but not satisfactorily completed, was the south-west corner of the house.
Sadly, this corner has seen the absolute worst weather of any part of the house. The rain hits it full-force, the sun bakes it all day long, and it's where the most pedestrian traffic passes.
The last "contractor (charlatan?)" to work on the house was STEVE MARCH who left me with this insane, "I-can't-even-figure-out-what-process-went-on-in-his-damaged-brain-to-put-together-this-haphazard-contraption" thing below.
Wishing on a rainbow
So, rather than accommodate this hideous mess, I went out on a limb ... I wished upon a rainbow and received from a friend, gotta love her, the following glitter-bedecked unicorn image. She sent it after she read the "crummy house" post (thanks Jill, you're a doll.)

Less than 2 weeks after receiving this "glittering prize," I scheduled to meet with a builder that we have used many times in the past (still not sure why he didn't do the backdoor ...). He came over and we discussed the mess, talked about the simple, clean solution that I wanted, and in a few days, he had the whole thing rebuilt.
The original design of this corner of the house was as such:
See photo below, it will hopefully make some sense.
Since creepy Steve went crazy with his saw-zaw, several clapboard ends were not salvageable. Some clapboards also exhibited wet rot on their ends (near the corner) that would have proved awkward to patch effectively.
The best option was to patch in a new vertical corner board on the bottom part of the wall that was wider than the original 3 inch wide corner board. That way the bad ends of the clapboards could be trimmed back a few inches to clean, sound wood. The new corner board would match the width of the original porch post immediately above, thereby visually extending a single "post" from the top of the porch to the foundation.
In reality, patching a new wide corner board onto the existing original old porch post would have created another area for potential water leak—fewer joints means fewer potential leaks. I opted to remove the old porch post board, and use a single 12-foot long piece of lumber to fill in the removed porch post and missing corner board—one single board that extends top to bottom.
Removing some additional wood gave me a chance to clean out the structural parts of the corner, add some insulation and shore-up the existing structure—some areas were a little "soft."
Fitting the boards was pretty straightforward, though it did take 3 of us to fit in that 12-foot long bugger. Once that was in place, a few small patches were needed at the window sill and a bit of caulk, just to be sure (interestingly, before attaching the new wood to this corner, the contractor caulked each meeting surface. I like this approach. It means that there is caulk within the joint between the boards, not just smeared on the surface.
A few days later, when the weather permitted, I primed and painted the area ... finally.
I also put down a new floor in the sun room and have been painting it - I plan to stencil it to look like encaustic tiles. Have been working a lot in the Japanese garden and have plans to scrape and paint the front porch floor, soon. Look for more, here, soon.
Sadly, this corner has seen the absolute worst weather of any part of the house. The rain hits it full-force, the sun bakes it all day long, and it's where the most pedestrian traffic passes.
The last "contractor (charlatan?)" to work on the house was STEVE MARCH who left me with this insane, "I-can't-even-figure-out-what-process-went-on-in-his-damaged-brain-to-put-together-this-haphazard-contraption" thing below.
 |
| Steve March, a terrible contractor i would never hire or recommend, made an absolute mess out of this corner of my house. His remedy was awful and he destroyed many original details in the process. |
 |
| A different angle so you can better see the contraption that wraps around the old porch post (sheathed in aluminum - the aluminum went away) |
Wishing on a rainbow
So, rather than accommodate this hideous mess, I went out on a limb ... I wished upon a rainbow and received from a friend, gotta love her, the following glitter-bedecked unicorn image. She sent it after she read the "crummy house" post (thanks Jill, you're a doll.)

I think it worked.
Less than 2 weeks after receiving this "glittering prize," I scheduled to meet with a builder that we have used many times in the past (still not sure why he didn't do the backdoor ...). He came over and we discussed the mess, talked about the simple, clean solution that I wanted, and in a few days, he had the whole thing rebuilt.
A few accommodations along the way
The original design of this corner of the house was as such:
the outside wall of the house was built of horizontal clapboards that met in the corner at a 3 inch wide vertical corner board. Above that was a ledge for the porch opening. On the ledge sat a "post," built-up of 4 wide-boards on the corner of the porch to support the porch roof.
See photo below, it will hopefully make some sense.
 |
| If you look carefully at the house right above Jody's head, you can see the wide porch post above a narrow corner board (both painted white). That's the corner of the house that was rebuilt. See after photo below. |
Since creepy Steve went crazy with his saw-zaw, several clapboard ends were not salvageable. Some clapboards also exhibited wet rot on their ends (near the corner) that would have proved awkward to patch effectively.
The best option was to patch in a new vertical corner board on the bottom part of the wall that was wider than the original 3 inch wide corner board. That way the bad ends of the clapboards could be trimmed back a few inches to clean, sound wood. The new corner board would match the width of the original porch post immediately above, thereby visually extending a single "post" from the top of the porch to the foundation.
In reality, patching a new wide corner board onto the existing original old porch post would have created another area for potential water leak—fewer joints means fewer potential leaks. I opted to remove the old porch post board, and use a single 12-foot long piece of lumber to fill in the removed porch post and missing corner board—one single board that extends top to bottom.
Removing some additional wood gave me a chance to clean out the structural parts of the corner, add some insulation and shore-up the existing structure—some areas were a little "soft."
 |
| Above is the "guts" of the corner. The red colored post is a replacement from "i don't know when." The fuzzy looking stuff is poplar sheathing and some pine? structural members. Those were sheared up, made sound, and new water-tight finish carpentry added to wrap the corner. |
A few days later, when the weather permitted, I primed and painted the area ... finally.
 |
| The smooth flat corner board was enlarged and extended from the old porch roof line to the foundation. While not the original design, it was a necessary compromise due to the clapboard ends being rotted back about an inch (too much to maintain the original design) and since this area gets a good deal of water, I didn't want to patch every clapboard and expose more joints to potential water infiltration. |
 | ||
| Close up of the corner and the window sill. There is a small triangular patch that the contractor spent about 45 minutes carving with his pocket knife to make fit - THAT'S the attention to detail that I seriously admire. |
I also put down a new floor in the sun room and have been painting it - I plan to stencil it to look like encaustic tiles. Have been working a lot in the Japanese garden and have plans to scrape and paint the front porch floor, soon. Look for more, here, soon.
Subscribe to:
Comments (Atom)