
OK, lets start this whole thing off with a "good" first impression before picture of the front porch:
 |
| The porch about 6 months after moving into the house. The cheap 1990's wicker came with the house—We've replaced it piece by piece. The swing is original. |
What's your first impression? Sure it feels inviting—it's a pleasant enough space. You can almost imagine yourself sitting in one of those great, wicker chairs, snuggled into the comfy cushions with a cup of hot coffee on a crisp fall day, or enjoying a summer breeze on the groovy swing with some lemonade. Even the palm adds to the "old-fashioned" charm of this porch.
But beware ... its like inspecting a used car: the paint's shiny and the upholstery smells pretty, and you can even imagine yourself driving on the highway listening to "Flock of Seagulls," but what's the engine like ? Did someone turn-back the odometer ? Is there a kid-puke stain hidden under the rug on the floorboard ?
Things happen over time
This is an officially old house; 100+ years old. Things happen to a house during its life, and in this case, almost every surface has been altered. If you dissect the photo above, the white "clapboards" on the walls are vinyl siding that was nailed on in the 1970's. The "trim" is all aluminum wrapped and holding in any drop of water that sneaks underneath. The floor, which I initially thought was kind of pretty, is really a mess of loose tiles hastily set on chipboard plunked overtop of the original tongue-and-groove, hard-pine floorboards. And the tile has 1+" grout lines that leak like crazy. Its a mess. It smells strongly of crappy cable TV DIY show "improvements".
You never know what is in the box until you tear off the wrapping.
Here's where it all gets messy. One day, without warning, Matthew disappears.
That's never good. It means he's up to something.
I heard banging and say to the dog. "Um, it's coming from the front porch, and ... oh crap ... what in god's name is he tearing apart out there?"
 |
| Matthew on one of his weekend "architectural-digs" |
I love a discovery as much as the next guy and I have always wanted to see under the vinyl. But I am more cautious than him. I plan my destruction. I strongly adhere to the tenant that once its discovered, you can't just walk away. You have to be sure you have enough time, patience, know-how and cash to repair whatever mess you find. To his credit, though, if tearing off that vinyl and aluminum was his version of "panning for gold," well then, for a change of pace around this old house, this time he struck gold.
 |
| I spent a little more time on the trim around the front door to ensure it looked as good as possible. There were a lot of things screwed into that trim that left big holes, but in this area I was able to scrape and sand down to the clear original wood. Its beautiful. This is dad-confirmed old cedar and was always painted - there is no evidence of stain or oil finish. The original "lead white" paint if visible at the top and bottom of the door trim wood. By-the-way, the red door has to go. It's the original door with original hardware (not the deadbolt) but the glass has been replaced by a sheet of plywood. The plan is to strip the paint off the door, re-varnish it, and "upgrade" the hardware to something a little more Victorian, rather than this standard craftsman style, that what all the houses on the block seem to have. |
Cool things found --- Questions answered
Every story has a highlight, or should, and this is the best part of this story. In one of my earlier posts I questioned the mysterious smooth, windowless wall in the living room where there is now a window. Tearing off the vinyl on the outside of the house revealed the answer. The "window" is absolutely not original. There never was a window on that wall. There were, however, a pair of doors that opened onto the porch—just like in the dining room. In fact, the dining room doors line up with the arch between the parlor and dining room, and the doors out onto the front porch. What a wonderful breeze they must have had in the house with all those doors opened. Not sure what we'll do about this discovery. See note about having the cash to fix what you find, above ... But WAY COOL thing to find out.
 |
| Look carefully along both left and right edges of this photo and you can see the lines in the wall from the replacement clapboards, after removing the french doors that were here. Interior baseboard repair matches the width exactly in this spot. Many houses in the neighborhood have french doors onto the front porch - in fact the house next door has 2 pair in addition to the main front door. There is no evidence about when or why this was done, but the clapboard replacements are the original-type, thick, cedar boards so I tend to think this was done early. The front porch was closed-in to use as a bed room for "Dittie," the grandmother, in 1952. I just don't thing they had access to the correct replacement clapboards, then, for replacement, and assume the doors were removed before they closed in the porch. From 1948-1952 the house was used as an upholstery shop and this alteration could have been done for that purpose. The craziest thing is that there is no evidence of a threshold for the doors. The floor is clear and smooth under the window. |
Demolition education
Under all that vinyl the original 1.25 inch thick, cedar clapboards were in amazing shape on the house, itself. Sadly, most of the clapboards on the knee wall—the short wall that circles around the porch and the corner posts—were replaced at some point with 5/8 inch thick pine clapboards. The wood trim looked super, thought, even under five layers of paint (originally lead-white, the trim was subsequently painted ivory, peach, white, and mint green, in that order), and the termite damage, which we knew we would find (mitigated 2 years ago), was not as bad as we anticipated.
 |
| Aluminum wrapping is nailed right into original wood. Vinyl is visible below ledge top. |
 |
| Part of the vinyl and aluminum removed (vinyl still on the left - removed on the right side). The wood clapboards visible are replacements of the original, and not installed that well. |
 |
| Evidence of clapboard replacement. The original clapboard's "shadow" is visible as a zig-zag on the corner board. The replacements did not hold up as well as the original cedar during the "wrapping," as is evidenced by the nail splits and cracks in the wood. |
 |
| If you look carefully you can see the shadow of the old corner brackets and the two sets of three filled screw holes that attached it to the porch. These show up at the top of all the supports for the porch. We want to replace them with something comparable - well do that after tacking the exterior part of the porch next summer. |
 |
| This photo shows the back of the house in 1958. Until at least 1960, when the owners who snapped this photo moved away, the house body was unpainted - note stained clapboards. The trim in this photo looks whiter than the original lead-white and is probably the fourth layer of paint put on the trim. Shortly after this photo was taken the whole house was painted white with mint green trim. About a decade later it was zip-locked in vinyl. |
 |
| Craftsman notations, this one makes me laugh. |
 |
| This is a really informative photo. Every board is original and you can see all the layers of trim color paint. The grey at the outer edge of the paint island is the original lead white. The house was originally just stained and left to weather, which held up really well till it was painted white in the 1960's. The ogee molding under the green ledge is an original feature that i plan to replicate elsewhere: this is the only place it is still intact. The clapboard immediately below the molding is an original cedar board (that's probably why they didn't remove the trim molding). |
Fixing the termite damage was tedious. Thankfully, the only place where I needed to repair it was the ledge board on top of one knee wall. It would have been very involved to replace the wood, so I opted to just fill the limited damage. Getting filler into the termite tunnels was the toughest part. First, I injected a rotted wood stabilizer (it's a syrupy liquid that re-solidifies soft, fuzzy, rotted wood.) Then used a liquid nail type product to inject into the tunnels (it comes in a tube, like caulk) It holds its shape pretty well and solidifies nicely. It can take up to a week to cure and you have to put it on in layers. It did sand well, and did the job for much less than epoxy resin.
 |
| Termite damaged knee wall top ledge before. Note - the largest hole is something I created. The tunnels were just below the surface and I couldn't get into them, so I cut off the top thin layer of wood to expose it. Also, see all those tiny tunnels that look like scratches? Interestingly, they cross the grain of the wood - most of the tunnels were parallel with the grain. |
 |
| Liquid nail-type product in place. I jammed the tip of the tube into the holes and filled as much as possible. then I used a plastic scraper to smooth it out a bit. Additional layers were needed to finish the repair. |
 |
| just one more layer of fill to add and it will be ready for primer and paint. |
The ceiling presented some trouble. The original was almost certainly bead-board, but I have zero proof of that since the ceiling was wholesale replaced. The ceiling that is up there now is, get ready ... really, really cheap, super duper cheap, plywood. Heck, it may be chipboard. I swear that last owners went to HD or Lowes and bought any low-end crap that was guaranteed to screw-up the house or last only 3 weeks. They didn't even spring for mid-range - low-end all the way. It's all crap. I'll save that rant for a whole entry. But replacing the ceiling with bead-board will cost more than $1000 and add time to our limited get-it-done-before-winter schedule. The most visible problem with the plywood ceiling was that the seams, where one sheet meets another, were warped and gaping and just a mess. So ... I pondered ... How can I make it look good super quickly and without spending any money on it so I can save my pennies for bead-board later on? What I came up with was a pseudo-beamed-type ceiling. Is it historic? probably not. Does it make it look pretty? Heck yeah. It's good for now and maybe one day well replace it with bead-board when I have enough pennies.
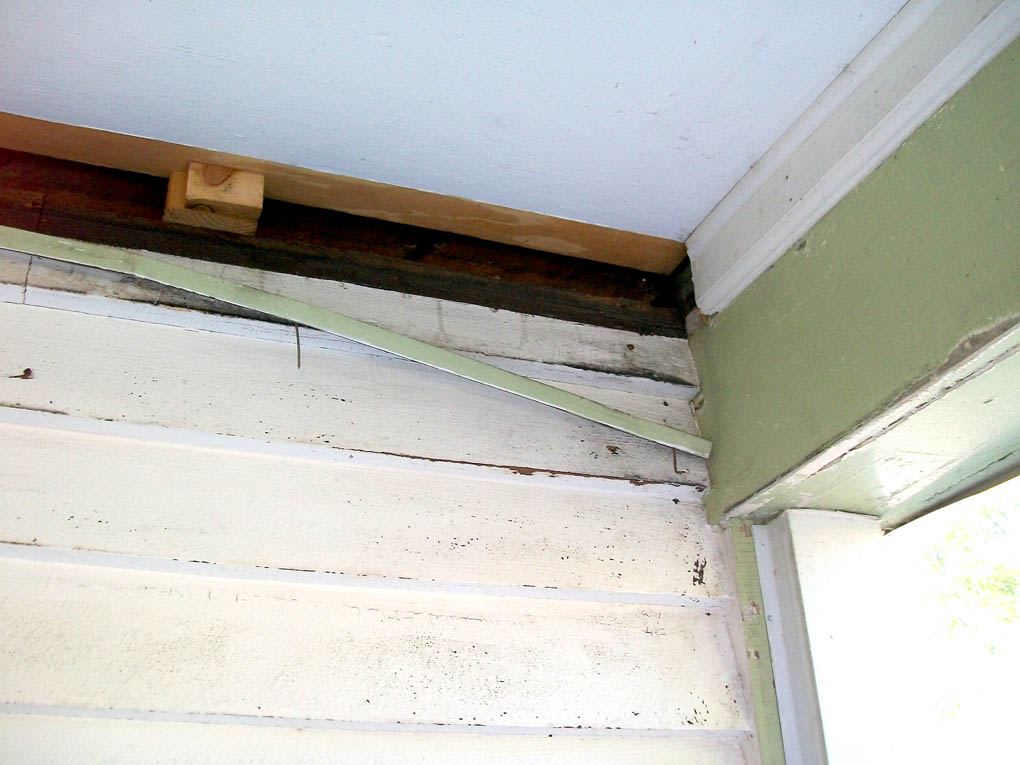 |
| This is what we found: cheap ply wood on the ceiling trimmed around the perimeter with thin, cheap baseboard and pixie-sized quarter round. At least they added support blocks to the house wall to hold up the ceiling boards where there were no joists. The thin trim was incompatible with the new ceiling plan so it had to come down. |
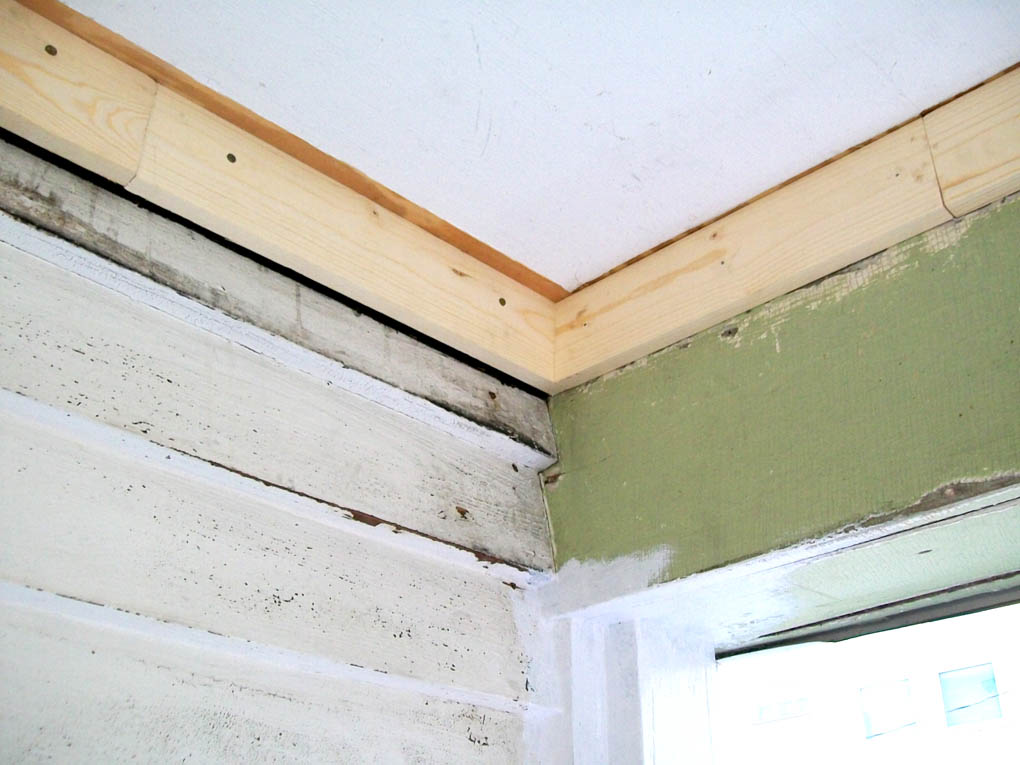 |
| New boards nailed around the perimeter of the ceiling give a smooth flat edge against which to butt the new ceiling "beams," and it looks more appropriate than the previous whispy-thin trim pieces. If this originally was a bead-board ceiling, the perimiter would have been trimmed with a big beefy quarter round molding--about 1.25 inch radius. Neighboring houses use exactly that, but big quarter round is very difficult to find, today. |
So far, the porch restoration was going well. We agreed that the floor can wait to be redone in the spring or summer. Who knows what kind of mess we'd find under that tile. Cold weather was approaching fast and we still had to paint everything.
Maybe I was scraping the walls, or putting boards on the ceiling, or something, when I saw the worst thing imaginable, out of the corner of my eye ... Matthew, pulling up tiles from the floor. "I just want to see whats under them" he said. Of course I tried to stop him, but he was a machine. He yanked, he pulled, he never rested. I was nervous. I felt kind of sick-to-my-stomach. Within minutes the tiles in one corner of the porch were gone and ya know, there was a real porch floor underneath.
He spent the next 2 days ripping off the tiles. Thank god the condition of the old wooden floor is not that bad, really. There are new replacement boards that someone added (we saw them from below when we inspected the foundation.) Those are in the worst condition. They are thinner tongue and groove and soft pine, rather than the wide hard pine that the rest of the floor is. The floor was originally just oiled, not painted. There are 2 coats of paint on top of the oil finish; one green, the other gray. It's currently serviceable, but not attractive. The screws that held the chip board base to the floor were all rusted and are, for the most part, still in the floor. We trip on them occasionally. Matthew doesn't like to be outside in the cold, so I'm pretty sure he'll leave it alone till spring.
 |
| during ... crap crap crap ... |
 |
| I have no idea what the yellow stuff is--it's not mold, at least. Here you can see the old, original boards (right, and wider) and the newer replacements (left, and narrower). Generally, the original boards are in far better shape than the new, which are pretty rotten. Guess that water got under the tile and could not escape and just rotted the cheap, new pine boards. |
Back on track
With the clapboards repaired and the nail holes filled; the ceiling put together and the termite damage filled in; the old oil paint primed so the new latex will stick; it's finally time to paint. One option I considered was striping the whole exterior and re-staining it back to the original finish. That was another grand idea that lasted 5 seconds before a flood of potential problems replaced the pride I'd feel in a restoration of that magnitude ... I'll paint.
- To clarify, this isn't just a porch restoration, its actually the front wall of the first floor of the house. The colors we paint will need to be used everywhere on the rest of the house.
You know I have to plan out everything. Since we moved here 4 years ago I have been planning the colors for the outside of the house. White houses are not my style. I prefer darker colors, or at least historic colors, which look the most appropriate on old houses.
Some houses at the turn-of-the-century were painted white. Most houses, though, were painted in fantastic earthy, rich, deep, vibrant, late-Victorian colors. Historic paint colors have pretty boring names such as red-brown, dark olive and shutter green. These are really just a description of the color, or are based on where that color was commonly used (yup, most shutters at the turn of the century were painted deep green, regardless of the other colors used on the house.) There weren't a whole massive array of colors from which to choose at the turn of the century. Nearly all paint was newly mixed on site. Buying paint premixed at a store, like we do today, was a new idea that hadn't yet fully caught on. Since each batch of paint was mixed on site, the final color varied a bit according to the person mixing the color and the raw materials available. That means that the color everyone called "old gold" was a bunch of different golden brown colors, sometimes more gold, sometimes more green, sometimes more orange, depending on the raw materials and the person mixing the paint. It stinks there is very, very little, extant evidence for us to see exactly what these historic colors really looked like, since most have been painted over, or if not, they faded from the sun.
In a collectible book about late-Victorian exterior color by Roger Moss, several pages of actual paint chips are included in the back. These paint color chips are recreated from a paint sample chart that dates to the 1880's. Devoe Paints recreated the colors by using a spectrochromograph, a technology that permits a color, no mater how faded, to be recreated based on its chemical composition rather than observation. Thereby, the colors of an old faded paint sample chart have been recreated anew by reading the chemical make up of the chart's colors, and using that chemical equation to remix extinct colors.
Williamsburg's big mistake
When Historic Williamsburg was first "discovered," the architectural colors of the town were read by visual observation, without consideration of fading. The fine anthropologists restoring Williamsburg, in conjunction with various paint companies, released collections of Colonial Williamsburg paint colors. It was groundbreaking since this was the first American historic site to be discovered, and to have a collection of paint colors for American home owners sold to the public. In the 1970's, empowered by the upcoming bicentennial celebration, everyone started painting things with this paint. The most pervasive color was that insipid, soft, dull, grey "colonial blue." Recently, using spectrochromatography, Colonial Williamsburg had the colors re-evaluated. They discovered that the colors they earlier introduced to the world were all wrong. The colors used by the colonists were actually vibrant peacock blues, loud tangerine orange and shocking mustard yellow, not soft blue green, sickly peach and dull cream. check out the new issue of Old House Interiors for some samples of the "right" colors.
What I chose for the house, and I considered things like the surrounding landscape and other homes on the block, is a dark olive for the first floor (SW2224 Caper), medium olive for the second floor (SW2222) and amber for the third floor (SW 2817) with fawn trim (SW 2814 Rookwood Antique Gold). The window sashes are white vinyl (YUK), for now, but when we do upgrade to wood windows, I want the windows and sashes to be bronze green, which is an amazing black green.
Finally, the after pictures - Ta Da!
The best part about the afters is the color change ... WOW. But keep in mind, this is now wood, not that crummy vinyl. The repairs are most important since they lend a few extra years to the house. Otherwise, these photos pretty much speak for themselves after reading the whole story above. You can see the first floor house body color (the second and third floors will be each different colors) and the house trim color. The floor is still messy, but we'll be better able to tackle that in the warmer weather (and torrential downpours) of springtime. The ceiling is looking better, though I continue to save my pennies for that bead board version.
These photos are all "after-during". I still have a little painting to do. Ill add photos of the after once spring arrives and I can really finish up the way I like.
BOY ... that red door is annoying - it will be stripped, stained and varnished and the full glass will be put back in (that's a thin sheet of plywood that the 3 windows are cut into ... its crap).
 |
| This photo shows both the color and "finish" the best. Some of the green clapboards were still wet when I snapped this. I hate the door, now and really cant wait to strip it. |
 |
| same view as the very first picture at the top of this story. This is facing south. Yeah, it still looks like a construction site - thats because it IS ... |
 |
| looking the other way (facing north) |
 |
| Color looks really bad. But a good view of the completed front wall. In the middle you can clearly see the still wet paint at the top - That's coat number 2. Still need a few warm days to finish. |
I love the trim on the ceiling and that light fixture! Nice job!
ReplyDeleteJim - amazing, simply amazing. the photos tell a lot, but your descriptive nature in telling the story and adding history along the way is enchanting. I could read things you write all day. Oh and the colors you picked even look amazing from the street late at night!
ReplyDeleteWhoa! You've gotta be kidding me...this house is more than a hundred years old?! You've done a well done job there. Not only do you have a skill in front house porch renovating, you also have a knack for storytelling.
ReplyDeleteWilliam Gulliver