"I painted one dining room red
and I must say,
the conversation became
very heated in that room. "
Heated, indeed. Here's to hoping that this latest restoration will generate lively and capricious conversation, instead.
The goal for this room was to create a space that would suit formal entertaining with our goofy-old collection of silver, china and crystal—and—restore the room back to its 19th century condition. Our dining room furniture is all
American Empire, or
"pillar and scroll", roughly 1800-1840, and the house is circa 1900. There was a modest interest in the Empire style, a low-key neo-empire period, about 1890-1910, so that highly specific era became the target period for this room.
Click on photos to see enlargements
 |
| A Scandinavian room from about 1820 is painted a deep blue-green with bright olive green upholstery |
Now, here's the thing, during the original Empire period, about 1810, and the Late Victorian Era, 1890, formal rooms were pretty much one of 2 colors,
red or green (and really, we love both of these colors). Dining rooms, then, commonly doubled as picture galleries and, as most of us know, or maybe it's just me, pictures with big fat chunky gold frames look best (really, they do) against highly saturated green or red walls
(note, in about 1800 an English Duke painted his picture gallery walls brilliant glossy yellow and the masses nearly drove the old boy out of town for such a disregard for tradition).
The dining room faces due-south and gets a ton-o-sun all day long, so, to keep it from looking like the freekin' Flames-O-Hell we went green, and after about 8 or 9 samples, chose a deep, golden glowing Empire-green from Porter Paint for the walls and
dark ivory (Sherwin Williams Ivoire) for the trim.
Before and After Gallery
We'll start off this before and after section with vintage photos from the Harris Family when they lived here in the 50's. These photos are kindly provided to me from Jody and Frieda, sisters who appear in the photo below and have have shared amazing stories of life in this old house.
 |
| The Harris family, circa 1952. I found the screw holes in the window trim from that birdcage. Check out that groovy super-chromed light fixture. |
 |
| Before 1 Dining room from the Kitchen doorway. We lived with that newly plastered, white primed ceiling for more than 2 years before I was able to start serious work in this room. |
 |
| After 1 Dining room from the Kitchen doorway |
 |
| Before 2 From the Parlor Doorway. The closed french door ? That's the one that wouldn't open (see below). |
 |
| After 2 From the Parlor Doorway |
 |
| Before 3 |
 |
| After 3 |
 |
Before 4 Cold and uninviting
|
 |
After 4 Oh so cozy
|
 |
| Before 5 Fireplace was never here, but we wanted to add the "hearth" to this room to increase its family-center feeling. |
 |
| After 5 The fireplace looks like it was here for the past 100 years, now. |
There are Worse Things I Could Do
The lovely, formal dining room, with a typical, Victorian, shallow, high-center-windowed bay and gracious french doors opening onto the breezy porch, was used as a dank, bland, what a honkin-huge-TV-you-got kinda tv room by the previous owners. Their thick fingered, tobacco stained, brown leather sofas, set at rigid right angles to one another, focused on the cyan-glowing mechanism, which stood pride-of-place where, once, a silver-laden sideboard sat. The walls were Cheap-Supermarket-brand-artificially-flavored-ice-cream-Mint-Green. The dog hair spattered draperies from K-mart had pink flowers printed on them. The cable connection jutted prominently out of the wall—way too high to ever be discreet. One of the sofas blocked the french doors from opening. The other, placed across the front of the bay window, made the room feel small and cramped. Even more pathetic was that the new floor they put in had the threshold installed too high so the doors would never again swing open, even if that fat-crappy sofa was slid away.
 |
| The previous owners dining room. I took this photo (this is a digital photo of a paper photo) on the night we did our first viewing of the house. You can barely see the tops of those ugly brown sofas. I hated the drapes then—I hate 'em now. BUT, with a can of spray paint, I was able to reuse the curtain rods in the guest bed room. |
PO's replaced some of the baseboards in the dining room. None of the corners were mitered to properly meet at a 45-degree angle – all evidently done by someone too "stoked" on HGTV's Candice, Vern or Carter to care about sensible carpentry. Even more, the top of every door and window where original, graceful, ogee-crown moldings once were, had them torn out so now the door and window frames sit dull and frumpy and I am pissed cause I gotta shell out more bucks to stick-em back on.
Previously, the ceiling was "fixed" with blow-on pseudo-flocking junk asbestos goo that plain made me itch. We couldnt tear it our cause of the freekin' asbestos, so it was covered over with one call to the plasterer (see
master bed room story for more about the new ceilings).
Not a single crack in the plaster walls had been properly addressed by PO's. I inherited a battle-scared surface that looked more like the surface of a child's salt dough diorama than a wall. The only thing that saved them was my amazing $14 paint scraper (and before unknown plaster scraper) and a few tubes of caulk (yeah, ok, I used caulk to fill the cracks. C'mon, its flexible, wont shrink or crack, smooths easily, is affordable. I mean, really, think about it before you judge)
Open a New Window, Open a New Door ...
OK, okay - There are 3 doors/openings into the dining room, 1. the French doors, 2. the door to the back hall/kitchen, and 3. the door to the parlor. All three were altered in some way by the folks who used to live here. With alot of sweat and time and some cash, I altered them all to more-or-less original appearance.
I removed the un-opening French doors by tapping out the hinge pins, after I marked their bottoms to be trimmed so they could swing open over the too-high threshold. The doors will be trimmed, scraped, sanded, cleaned, glass re-pointed, washed, repainted and finally rehung. WHEW! This time, though, the original black iron original hinges will have been safely stashed in a shoe box in the attic. I will rehang the doors with solid brass Aesthetic-period hinges and matching Aesthetic brass doorknobs and plates (they never had handles or knobs, before). for now the doors sit in the hall awaiting a decent day to drag them outside to saw, scrape, sand etc.
Hang on. Let me take a second, here, to define a door way, as opposed to a door, in my house. A door is a hunk of wood hung into an opening that can be swung into or out of the opening to allow you to close off or enter/exit a room. A doorway, usually the same size as a door, has no hunk of wood to swing around. It's usually framed by wood, or in some cases, simply plastered smooth (these smooth doorways are often topped with a curved arch, an archway)
The second doorway, the one from the kitchen/hall, remained relatively the same size, but, like so many others doorways in the house, had been transformed into a 1920's pseudo-romantic, tudoresque, faux-Victorian archway that had too many layers of metal corner beading and thick uneven plaster. In the 1950s it was lined with pale green tile and chrome trim. Many people cried mountains of tears when they heard I was tearing out the arches. "They are so pretty" one cried. "I really love those pretty arches" another e-mailed. Well, well, well, my little pretties, the oscillating saw never stopped humming when it heard those cries. Like a crazed dictator invading Iraq, I was insensitive and unstoppable. I ripped out more and more of the thick sheet metal that shaped the curve, slapped bandages onto my bleeding battle wounds, and bit off hunks of plaster and poorly placed drywall patches with my bare-teeth to reshape the door frame back to nearly its original proportions. It now stands tall and proud. An uber-masculine, custom-made (by me), wood-trimmed, so near to how it looked when built over 100 years ago, doorway.
 |
| From left: 1, OK, so I realized I needed a before photo after I tore off the first layer of plaster so what you see is the metal framework that created the arch, The framework was made of 3 parts; 2 "corners" and one center piece. 2, the pile of metal from the doorway corners. Those rusty edge "wires" are almost 1/4 inch in diameter. 3, Doorway after demolition. The original framing is visible at the top of the doorway. I reluctantly left some corner bead on the sides (the plaster would have been demolished had I tried to remove it) so the doorway width is about 1 inch narrower than original. I did all this late one Sunday night in my bare feet and 'jammies. |
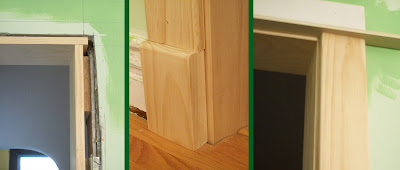 |
| From left: 1. The weekend following the above demolition, two weeks after I made all the molding, I fitted the first of the two doorways with wood trim. This was the first time I ever did anything like this so it took about four hours. Here is the jamb in place. 2, the plinth blocks, custom made, dry fitting to see tightness of joints. 3, the trim molding in place, except the overly-long bead trim - I pulled it out to rout the correct size and shape, then slipped it back into place the following weekend. |
The doorway between the dining room and parlor, went thru hell. It kinda makes me cry to think about it. Originally a grand, wide, wood-trimmed, square opening, it graced the wall from dining room to parlor. At some point before about 1940, the crisp wood trim was ruthlessly torn down like that big wall in Germany, and a curved archway installed in its place (note: there are 7 total doorways that were transfigured into arches in this house - when I am thru, only 1 will remain).
In 1952 the Harris family enclosed only the bottom half of this wide archway to create a wall to sit the TV set against, leaving a wide arched window above that.
 |
| Visible behind this lovely couple is the half wall arch between the dining room and parlor, 1959. The dining room at this time was mint green (layers of paint discovered during deconstruction of some walls shows evidence of 5 different shades of green and only one other wall color, pale blue |
 |
| You probably figured out that the mint green view of this doorway was from the dining room side. That hot pink is the parlor color (yeah, still). These photos (again, digital photos of paper photos) were taken when we were moving in in 2007. Note the lovely textured archway tops painted white - they matched the ugly ceiling - SHEESH! |
After the Harrises moved, the center of that half-wall was opened up, creating a mushroom shaped opening, so you could walk between the rooms. A pair of columns were added to each side of the arch at some point, and then the PO's right before us torn them out. I hated the mushroom - I mean, im not Alice or the Mad Hatter or anything, and this sure ain't horse manure, SO, I had the top sides closed in to make a nice, normal, conservative doorway. Then, after it sat bare and raw, with unfinished plaster edges, for 2 years, I had to reframe it in custom-made wood trim like the other doorway. Now, to all those of you who said I was flat-out insane for making it into normal-sized door way, rather than tearing out the whole wall to "open it up" ... take a looksie.
 |
| Parlor doorway. Size = 34 inches wide x 85 inches tall, just like almost all the other doors in the house. |
The entire ceiling was re-plastered, smoothing out the rough, texture that was better suited to a family room or basement, not a formal dining room. Here's the newly painted smooth ceiling that harkens back to empire period garlanded circle and oval designs (circa 1810). With time (and $$) I plan to add garland stenciling (
sample 1,
sample 2,
sample 3) and crown molding to the ceiling. Oh, yeah, that medallion - uh hu - hand painted - not easy to do and pretty time consuming ... look carefully ...
My Favorite Things: Prep work
Scraping out the old caulk was easy. I have done this one a million times. A super sharp putty knife, pull-scraper and shop vac used like this: cut through the edges of the caulk with a sharpened putty knife so you have smooth straight lines on both sides of the crappy stuff (in most cases, a corner between the trim and a wall), pull scrape it out of the corner, vacuum, repeat. The funkiest thing was where the paint stretched off the walls or trim like it was sheets of caulk. Someone told me that's cause it was poorly adheared latex paint. Probably true since almost all the paint used in the house by the POs was hastily applied right before it went on the market—just like they do on HGTV or Extreme Home Makeover (really, do they ever let that paint cure? every
tchotchke must stick to the shelf it's on ... but the bed looks like a race car ... cool)
Once the caulk is scraped out the trim gets scraped and sanded. In this room that was the dirtiest part. tape off every opening: every door, every window, your nostrils, too, if you can. That dust gets everywhere. But really, what is the option - paint on top of crap only to have more crap that's a different color ? Umm, not for me. (ok, while demolishing one of the arches i neglected to tape off the room and dust covered everything in the kitchen. It took over an hour to just dust off the kitchen counter (it's sticky dust, too)
Then its onto the walls, scrape (lightly, very, very lightly, like pixies dancing on the sky ...), then sand them where necessary.
The best part of the scraping/prep side of this work was discovering things, like the original paint color of the room, the original door framing, and below, the original shellacked oak trim.
 |
| An original paint color found under removed baseboard. |
 |
| Original Window Trim wood. This was the same throughout the house. |
Then ya gotta refill all those holes you made. Caulk all joints, patch all nail holes and any plaster that came loose, caulk the cracks (see above).
These last 3 paragraphs took you, what, 30 seconds to read? Multiply that by about a jillion and you get real-time on this part of the job. I posted the day I started scraping this room on Facebook, July 6, 2010, and the scraping and sanding was finally done and ready to prime in mid October. (ok, we repainted the garage and rebuilt the rest of the basement in there, too, but come on, people)
Paint Your "chuck" Wagon
 |
Unretouched photo of the intense green wall color hand applied over brilliant lime
undercoat. Note on the left side some brush strokes are, indeed, visible,
exposing the lime undercoat. |
The perfect wall color, the perfect color, indeed, is so often done in the fluorescent brilliance of Lowes or Home Depot on a Saturday morning with about a million do-it-your-selfers milling about and screaming kids in every other cart wizzing past you. Choosing the right paint color took me over a year. A while back I read a book on the history of paint and saw in it a photo of an untouched painted room from about 1860. The deep green walls of that room literally glowed, it was stunning. Thats whats possible with good old poisonous lead paint with arsenic in it. Alas, I had to make due with plastic emulsion (aka, latex). I thought constantly about reproducing that color—I was obsessed. Finally, I concluded that I had to recreate it with several colors and multiple layers of paint.
 |
| Underpainting 1 Most visitors thought I was absolutely nuts |
 |
| Underpainting 2 The first of 2 coats of chewing-gum green primer |
Want to know how crazy I am ? I had Lowes remix my primer three times before it was the right shade of screaming, hubba-hubba, chewing gum green. No one thinks about how the primer color changes the paint you put on top of it. I wanted the walls to glow like the ones in that photo. If I used the right primer color, and hand-brushed the top coat of paint in thin washes, darkening the wall color toward the corners, I might get something of the look I was after. I undertook painting the walls like they were massive canvases. I painted out the light in some areas and let the glow of the brilliant green primer show thru in others. I wanted candle light. It's a subtle look, and the flat finish of the paint, along with hand-brushing the paint (no rollers were used in this room), give the walls the look of glowing, old, silk velvet.
Part 2, Dining Room Details, and more on trim wood, coming soon


Nice...
ReplyDelete